Expose and Spaces: Effectively using your Macs Screen with Spaces
Spaces and Expose, a must have for ALL macs. These two settings will greatly increase your productivity on your mac. Allowing you to quickly switch to dedicates spaces/desktops with shortcuts or active corners setup with Expose. We will also cover how to assign application to spaces and even use mouse buttons to quickly switch spaces.
Quick Nav:
Step 1: Setup Expose’s Active Corners
Top Left: Dashboard
Bottom Left: Desktop
Top Right: All Windows
Bottom Right: Spaces
You may set this up however you like, this is how I like it setup. The dashboard (Top Left) seems to be troublesome at times since you often navigate to close to the top left corner, unintentionally activating your dashboard.

Step 2: Spaces Setup
Check the Boxes: 1. Enables Spaces 2. Show Spaces in menu bar 3. When switching to an application, switch to a space with open windows for the application.
To switch between spaces: ⌘ Arrow Keys
To swith directly to a space: ⌘ Number Keys

Step 3: All Windows Expose Results
Your Top Right Active Screen Corner is essential, you will find yourself using this in conjunction with your spaces. So get in the habbit of using this.

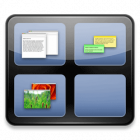
Step 4: Spaces Expose Results
This is the Bottom Right Active Screen Corner. It will show you active spaces. Right now you dont have any applications assigned, so you will see empty spaces. We will get into that next.

Step 5: Application Assignments
This step is critical, and will allow you to make the most of your new real estate on spaces.
Click the + button and select the Application you wish to assign to a space.
I reccomend you leave the spaces set to 4, simply because switching between more than 4 spaces can become a nuance. If you want more, click the +/- in the Rows and Columns area, decide on this before you start assigning applications to spaces as it will juggle them around if you add/subtrack the number of rows and columns you use.
Reccomendadation on Spaces Assignments:
Space 1: Web Browsers, Messanging Apps
Space 2: Mail Apps, Calendar Apps, Word Processors, and PDF/Acrobat Apps, and other primary productivity apps.
Space 3: iPhoto, iTunes, Graphics Editors, Programming Apps, and other productivity apps.
Space 4: Finder, Terminal, System Preferences, and other utility type apps.
Note: for apps like Preview, do not assign a space, generally if you are using this you will want it to open in the active space. You might do the same with Finder in case you want it to open in all spaces.

Step 6: Shortcuts
To switch between spaces: ⌘ Arrow Keys
To swith directly to a space: ⌘ Number Keys

Step 7: Mouse Shortcuts with SteerMouse
This is going a little beyond the scope of this post, but I wanted to mention it. SteerMouse is a great app that allows you to assign mouse key shortcuts OS wide, or Applicatin specific. You can download a copy at http://plentycom.jp/en/steermouse/
You can utilize SteerMouse to setup either the side thumb buttons or side tilt wheel to switch between spaces.
I have set mine up on the side thumb buttons. See Button 4 and Button 5. Please note your mouse will likely be different. Hover over the mouse and click the mouse button to identify which button matches up.

Step 8: Setup of SteerMouse Buttons
Within the button, select Input Shortcut Key, then select the Left Arrow for the first button. Then set the ⌘ icon, we set these shortcut in a previous step. Do the same thing for the other button and select Right Arrow + ⌘.
Thats it. You can now begin using spaces and expose to its full potential! I consider this a MUST have setup for all Mac users.

Did you love this post?
Then please share it!


One Comment