How To: Create DMG Art for Fancy Application Installations
In this series we go over how to create DMG disk image artwork for use with your apps or applications. Having a professional looking installation folder is critical to your apps image, and rather simple to achieve good results.
Quick Nav:
Step 1: Create a Background
I would recommend using a size such as 700px by 400px, however you can use any size you want.
Save the file as DMG and set it aside for a future step.
Note: Please post up your artwork, we would love to see what our Members have created!

Step 2: Create a Custom Size DMG
First Create a DMG according to your size requirements, to do so follow the instructions in our other post Create Encrypted DMG Disk Images
Be sure to not use encryption, which would enable password protection.

Step 3: Background Folder
The DMGDemo.dmg should of automatically mounted, double click on the mounted DMG.
Create a folder inside the mounted dmg and name it “backgroundâ€. Drag the background image we created into the mounted DMG’s background folder. The background image needs to reside inside DMG, otherwise when the DMG is opened on another system it will be looking at the wrong location, and not a localized folder on the DMG.

Step 4: Place your Files or App
Drag your app file onto the DMG, we will rearrange them once we setup the background image.

Step 5: Create Applications Shortcut
Open your root hard drive and Right click on Applications and select Make Alias. Drag the Applications alias onto the DMG.
Rename the Applications alias as “Applications”


Step 6: Change Icons
First find the icon your wish to use (generally the same as your Application), it can be any volume, application, file, or folder icon. Simply click on the icon and hit Cmd + C to copy the Icon.
Right click the Mounted DMG icon from the Desktop, and choose choose Get Info or press Cmd + I.
Click the icon in the upper-left corner.
From the Edit menu, choose Paste or press Command + V to replace the icon.

Step 7: Hide Folder
Make sure you have Developer tools installed, aka xcode. If you do not, go download it! - note, you will need to be a ADC (Apple Developer Connection) Membership, but don’t worry its free.
Open Terminal and perform the following command to hide the background folder.
/Developer/Tools/SetFile -a V /Volumes/your_image_name/hidden_folder
your_image_name : in this case, “DMGDemoâ€
hidden_folder : in this case, “backgroundâ€

Step 8: Change the Views
Right click in the DMG and select Show View Options, or your can simply press Command + J.
1. Change the Icon size to whatever works best with your design, we will be using 128 x 128.
2. In Background: select Picture, and drag your background we created to the “Drag image here” section.

Step 9: Arrange Icons and Re-size Window
Rearrange the icons to your liking, they will stay in place.
Resize the window so it matches up with your background image.

Step 10: Compress Image
Right click the DMGDemo mounted image and select Eject.
Open Disk Utility and right click the DMGDemo.dmg and select Convert…
Image Format: select compressed
Enryption: Not needed, but you can select it if desired.

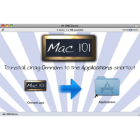
Step 11: Results
The DMG was compress and made un-writable, and for this example its now 3.1MB and ready for distribution.
We would love to see some DMG artwork created by our members, so please feel free to post them up here!

Did you love this post?
Then please share it!


October 26, 2009 at 12:31 pm | marcoslavorato
Really tanks man. This is I need.
February 27, 2010 at 8:54 am | reyer
I tried to do this but when i give the package to someone else they do not see the background image. Could you please help me further??
February 28, 2010 at 5:44 pm | Mark
Did you do Step 3 correctly? The background needs to be placed in the DMG, then you hide the folder on Step 7.
March 19, 2010 at 11:51 pm | kent
I tried it too and got the same results. It works fine on the computer I made it on but when I try it on a different computer the background image isn’t there and the windows opens up the wrong size.
I did put the background image in the background folder and hid the background folder. But it does seem strange that the instructions say to hide the background folder before you drag the background image from the folder into the dialog to set it as the picture for the background.
How are you supposed to open the folder to drag the image file when the folder is invisible?
And how does it know what size to make the window when it opens on a different computer?
February 21, 2011 at 11:48 am | bcteh
I tried it too and got the same results.
After try again. Found that
step 3: the background image should put at DMG root . ( not inside backgroud folder)
step 8: Tick “Alway open as Icon View”
Not sure the end result is same tip. but still look good.