Simple Hard Drive Cloning/Backup with Carbon Copy Cloner
Owning a mac is great, mostly because of the plethora of simple, and effective tools that can often be had for free. Carbon Copy Cloner is an excellent example. This essential tool allows you to make exact (bootable) clones/backups of your hard drives. Some of the key features include, block level disk to disk clones, scheduling, network based backups, bootable disks, and fast incremental backups.
Quick Nav:
Step 1: Format the Target Drive
Attach the hard drive you will be using as the destination of the backup/clone.
My intent here is to migrate my stock MacBook’s Hitachi 250GB hard drive to a new Seagate 7200.4 ST9500420AS 500GB drive.
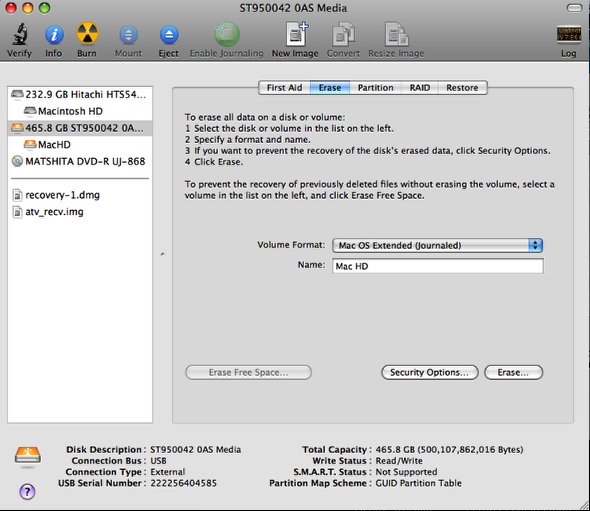
Open Disk Utility and select the destination hard drive. Select Erase and by default the Volume Format should be Mac OS Extended (Journaled). If its not go ahead and select that option and give the drive a Name. Be sure you have the correct drive selected and select Erase. It will erase the drive, and create a partition across the entire disk.
Step 2: Download and Install Carbon Copy Cloner
Navigate to http://www.bombich.com/software/ccc.html and download the latest version of Carbon Copy Cloner.
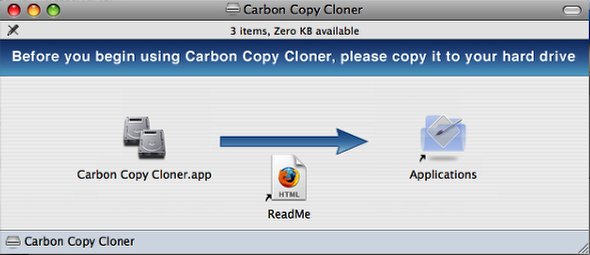
Drag the Carbon Copy Cloner.app to the Applications shortcut. Once installed Open Carbon Copy Cloner.app from the Applications folder.
I suggest making a small donation to Mike Bombich, there is a link on his website to provide a donation via PayPal. If you only use this app once its well worth the small contribution.
Step 3: Carbon Copy Cloner Simplicity
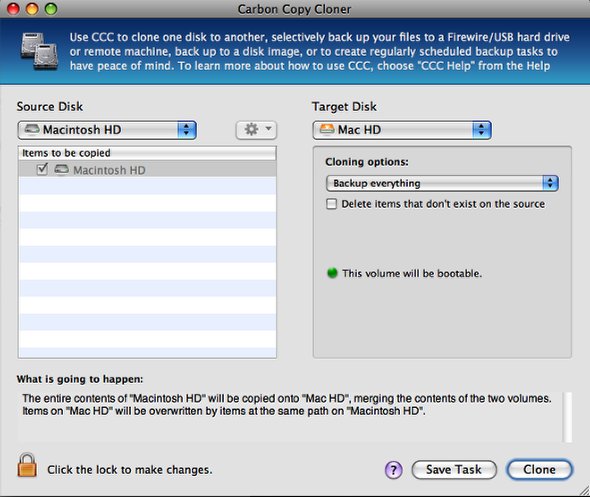
Since I am migrating my hard drive to a fancier ST9500420AS drive I will be selecting a bootable clone. To do this, select your Source Disk "Macintosh HD". Then select the Target Disk that we just attached and formated, called "Mac HD". Select Backup everything, and it wil indicate that the Target Disk will be bootable.
Once the options have been selected, click the Clone button to initiate the cloning process.
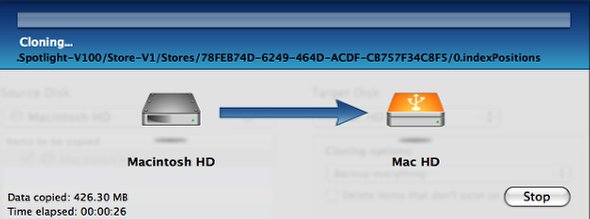
Step 4: Cloning Screen, and waiting…
Truthfully this entire process doesn’t take that long, even though its conducting a block level dupe of your active hard drive. For me, the process took 1:45min to copy my 250GB Hitachi to a 500GB Seagate.
Since my goal here was to duplicate my hard drive, my next step was to swap out the hard drive and boot up on my new hard drive, and it worked flawlessly. If you are cloning and replacing your current drive, be sure to run a Disk Repair in Disk Utility once you boot onto the new drive.
In future posts, we will go over scheduling, incremental backups, and network attached backups with Carbon Copy Cloner, additional we will provide the instructions for replacing your unibody MacBook hard drive.


October 20, 2009 at 10:54 am | drummerob402
So, if I bought a new internal hard drive for my mbp, i should do this process with an external HD, then replace the internal HD and reverse the process. Is that correct? Thanks, Rob.
October 20, 2009 at 11:14 am | Mark
Easiest way would be attach the new internal via a USB or external esclosure and run the clone process. Copy the current internal to the new internal HD then replace the existing with the new one.
July 30, 2010 at 10:22 am | BonesnBraids
Hi there. Ran across this helpful info and have a question. I posted it in the CCC forum so I’ll just link to it. If you have any info or could forward me to a place that could help me with my CCC problem I’d greatly appreciate it.
http://help.bombich.com/discussions/questions/709-authentication-credentials
Thank you!
February 23, 2011 at 4:28 am | Mischa Elman
CCC is good Application for cloning Here is another software called Stellar Drive Clone which has more options like Cloning Mac hard drive, Imaging,Restoring your Data and Bootable to create a bootable disc of your Mac drive..
December 28, 2011 at 2:55 am | skyrimz
This article is very useful. I have used my Mac for years and did not notice my disk is consuming by the useless files. This article helped me much. I also found another free cleanup software MacCleaning. It is free and effective.
January 31, 2013 at 9:03 pm | benzaminwatson
Although for taking incremental backups CCC and Superduper are good cloning softwares of Mac but now I replace these softwares with Stellar Drive Clone because of its easy to use interface and support to Ex-Fat formatted drives and MBR partition scheme. It also give support to my new SSD and make bootable clone of my drive/volume. So, Clone mac hard drive is important in order to protect your data from any loss.
January 31, 2013 at 9:24 pm | adison
CCC is one of my favorite tool, but sometimes I prefer to use Stellar Drive Clone because of its simple and easy to use interface. Sometimes, CCC performance goes very slow and thus disturbs the overall performance of machine.
March 31, 2013 at 11:19 pm | benzaminwatson
CCC is great application for cloning your Mac drive but I must say not simple one. Before a month ago I replaced it with Stellar Drive Clone and its amazing. It creates bootable clone of my drive smoothly and fast.