PC to Mac: Using Terminal to Fix Multiple Locked Files and Folders At Once

You might find your old PC data to have tons of random Locked files and folders in Mac OS X. Terminal comes to the rescue with chflags command that will help us unlock the file/folder by removing the locks in masses.
Quick Nav:
Step 1: Overview of chflags
NAME
chflags — change file flags
SYNOPSIS
chflags [-R [-H | -L | -P]] flags file …
DESCRIPTION
The chflags utility modifies the file flags of the listed files as specified by the flags operand.
The options are as follows:
-H If the -R option is specified, symbolic links on the command line are followed. (Symbolic
links encountered in the tree traversal are not followed.)
-L If the -R option is specified, all symbolic links are followed.
-P If the -R option is specified, no symbolic links are followed. This is the default.
-R Change the file flags for the file hierarchies rooted in the files instead of just the files
themselves.
The flags are specified as an octal number or a comma separated list of keywords. The following key-words keywords
words are currently defined:
arch, archived
set the archived flag (super-user only)
opaque set the opaque flag. [Directory is opaque when viewed through
a union mount]
nodump set the nodump flag
sappnd, sappend
set the system append-only flag
schg, schange, simmutable
set the system immutable flag
uappnd, uappend
set the user append-only flag
uchg, uchange, uimmutable
set the user immutable flag
hidden set the hidden flag [Hide item from GUI]
Putting the letters “no” before or removing the letters “no” from a keyword causes the flag to be
cleared. For example:
nouchg clear the user immutable flag
dump clear the nodump flag
Step 2: chflags to Remove Locked Files and Folders
Ok, so we are here primarily to learn how to remove the Lock on files on folders in multiple items at once. So here is what you need to do.
First make sure you are logged in as owner/super user.
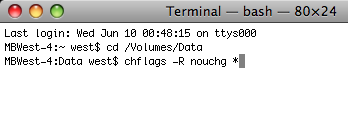
Open Terminal app and Navigate to the folder in which you want to remove the Locked files in. I wanted to run this on my entire drive as I had locked files and folders everywhere. The locked files and folders happened on most of my hard drives I brought over from my old PC.
Navigate to the drive, folder, or wherever you need to remove the locks. Type cd followed by the desired path. You can also drag the folder onto terminal and it will enter the path for you.
Type:
chflags -R nouchg filename
In my example I used * in place of filename since I wanted to remove all locked files and folders.
Rember the reference above, -R will apply this change to all sub directories and sub items.

Step 3: Removing the Lock
chflags -R nouchg *
This will remove all Locked files and folders in the destination path and all of its sub directories/children items.

Reference: Adding a Lock
chflags -R uchg *
This will lock all files and folders in the destination path and all of its sub directories/children items.


