Secure Remote Access to Your Mac Using SSH - Part 3

Now that we’ve setup the Mac to accept SSH connections securely using key authentication instead of passwords, what can you do with it?
This section will describe how to transfer files using a program like Transmit, controlling your home computer using VNC and routing traffic through the SSH tunnel to keep your information safe and protected if you are on an unsecured network or hotspot.
Quick Nav:
Step 1: Using Transmit to transfer files between your home computer and laptop
There are numerous programs available that will let you transfer files over the Internet, however to protect your data and information you should always use a program the supports SFTP (Secure File Transfer Protocol), such as Transmit or CyberDuck to name a few. In our example we will show the configuration using Transmit.
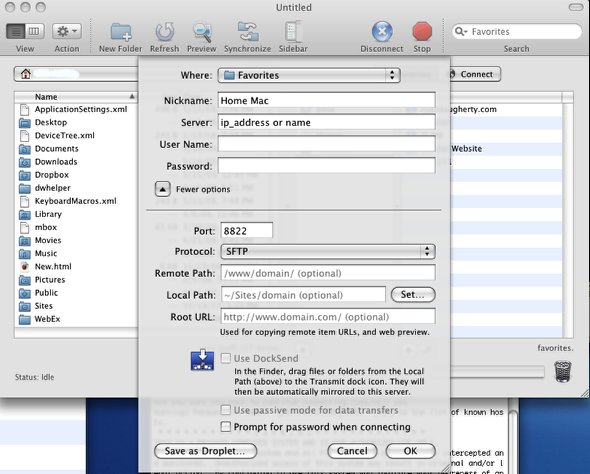
1. Start the program and create a favorite with the information for your home Mac.
2. Provide a name for the system you will be connecting to and enter either the ip_address or the FQDN (Fully Qualified Domain Name) if you have registered your home
router IP address with a service like DynDNS.
3. Select SFTP under Protocol and be sure to change the Port to match the one selected in your configuration. In our case we used 8822.
4. Save the settings by clicking OK.
5. That’s it! When you click on the name under Favorites to make the connection, your home computer will prompt you for the passphrase you assigned to your key. Enter
the passphrase and you will be connected.
6. Now you can move files back and forth between your home system and laptop over the encrypted connection.

Step 2: Using VNC to control your Home Computer
If you want to do more than just transfer files back and forth, then you will need to use VNC, which actually allows you to control your computer remotely. Now, if you are a MobileMe subscriber you already have this capability using Back To My Mac, however this is a free alternative.
There are many VNC clients available, but I recommend using JollysFastVNC, which has SSH capability built-in.
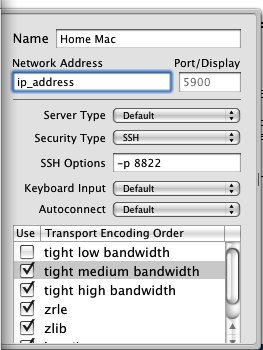
1. Start the program and create a favorite with the information for your home Mac.
2. Provide a name and enter the ip_address or the FQDN for your home router.
3. Under Security Type, select SSH and a new field appears, called SSH Options. Enter -p 8822, which tells VNC to connect using port 8822
4. Leave all other options as the default and save the favorite.
5. When you connect you will again be prompted for your key passphrase. Enter the passphrase and you will be connected and have remote control of the computer.
JollysFastVNC has a nice SmartZoom feature which allows you to navigate your large desktop screen easily.
If you use a VNC client that does not support SSH, you will have to use a trick called port forwarding.
To set this up, open a Terminal session and type:
ssh -p 8822 -L 5901:localhost:5900 username@ip_address
The new option that we added -L 5901:localhost:5900 tells the computer to take any traffic that it sees on port 5901 and forward through the tunnel to port 5900.
Now you can setup your VNC client on your laptop to connect to the localhost using port 5901 and the traffic will be forwarded through the tunnel to the remote computer’s port 5900.

Step 3: Tunneling other Traffic via Your Home Computer
Just like we port forwarded the VNC traffic, you can do the same for your inbound and outbound mail traffic, using the -L option with the ssh command
This will allow you to send and receive mail as if you were on your home network and is especially useful if your ISP restricts sending of mail from IP addresses not on their network.
To enable port forwarding for mail traffic, use the following command to setup a SSH tunnel:
ssh -p 8822 -L 8025:mail.isp.net:25 -L 8110:mail.isp.net:110
where 8025 and 8110 are the local “server” ports that you will setup in Mail app and mail.isp.net is the name of your ISP’s mail server(s).
Port 25 is for SMTP and 110 is POP3
On your local computer you will use localhost or 127.0.0.1 for the server name and the respective ports, either 8025 or 8110 in the Mail app setup.
Now, when you connect this traffic will be tunneled to your remote computer and then to ISP’s mail servers.
Remote Access, SSH


