Secure Remote Access to Your Mac using SSH - Part 1

Did you ever need to access your home or office computer while on the road? Concerned about security using public services? Now you can securely access your Mac from anywhere on the Internet using SSH and Public Key Authentication.
Quick Nav:
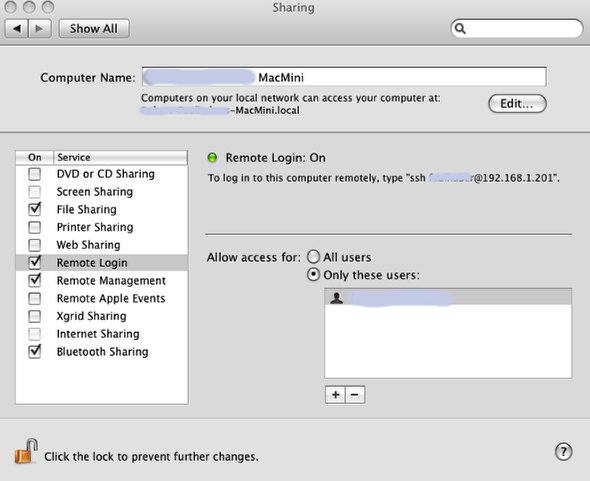
Step 1: Enable Remote Login on System Preferences under Sharing
1. Enable Remote Login on System Preferences under Sharing
2. To enhance security, make sure that access is only allowed for authorized user accounts

Step 2: Add Warning Banner
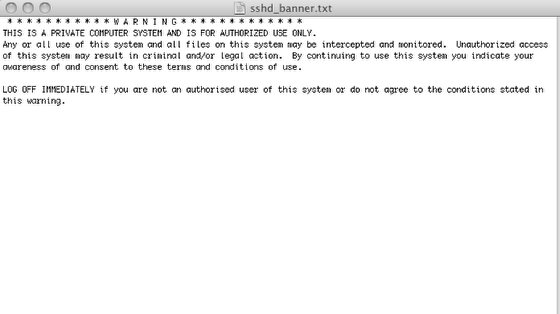
1. Create a generic login banner called sshd_banner.txt on your Desktop using TextEdit, which warns users that they are accessing a system and if unauthorized they may face criminal or legal actions. This will not prevent malicious users, but gives you right to press charges if they are caught. (See sample)
2. Change to the /etc directory by typring the cd /etc command
3. Copy the sshd_banner.txt file from your Desktop using the following command:
sudo cp /Users/Name/Desktop/sshd_banner.txt sshd_banner.txt
where Name is your logged in username.
4. You will be prompted for the root password. Provide when prompted and hit Enter.

Step 3: Editing sshd_config Configuration Settings
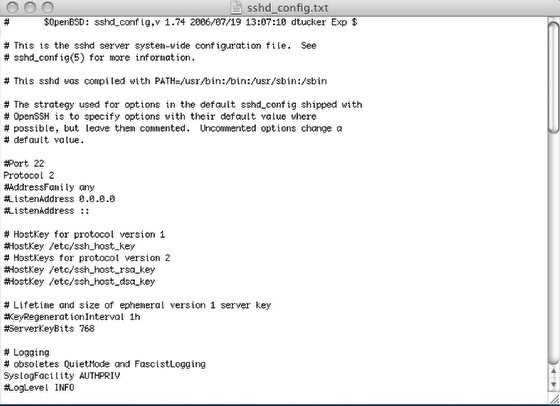
The sshd_config file is located in the /etc directory.
1. Edit file with vi using the following command: sudo vi sshd_config
2. Provide the root password when prompted.
3. Make the following changes to the configuration file:
Under Authentication section:
a. Remove # from LoginGraceTime
b. Remove # from PermitRootLogin
c. Change Value of PermitRootLogin to no
d. Remove # from StrictModes
e. Remove # from MaxAuthTries
f. Change Value of MaxAuthTries from 6 to 3
Scroll down and locate RhostsRSAAuthentication
Change Value to no
Scroll down and locate AllowTCPForwarding
Remove # from AllowTCPForwarding
Scroll down and locate PrintLastLog
Remove # from PrintLastLog
Scroll down and locate UsePrivilegeSeparation
Remove # from UseprivilegeSeparation
Scroll down to Banner
Remove # from Banner
Change path to /etc/sshd_banner.txt
When done making all these changes, save the file and exit the vi editor.

Step 4: Test SSH to your Mac
Your computer should now be ready and capable of accepting SSH connections.
Using another computer on your local network, test the connection by using the following command:
ssh Username@IP_address
where Username is the account you setup when you enabled Remote Access and IP_Address is the TCP/IP Address of your computer on the local network.
If everything is correct, you will see the Banner you created and be prompted for the password associated with the account you are trying to login with.
This completes Part 1 of this Tutorial.
In Part 2, we will describe how to setup the more secure Public Key Authentication and how to configure your router for Port Forwarding to allow access from the Internet.


July 8, 2009 at 3:19 pm | nberanger
I think I am missing something with this… I am assuming that starting with step 2 #2 you are using Terminal. I follow through with your steps but once I am finished editing sshd_config.txt, what do I do? Is there a command I need to use or can I just quit terminal?
July 8, 2009 at 5:24 pm | Bob
nberanger - Thanks for pointing that out. After making the changes, save the file and exit the vi editor.
July 26, 2009 at 8:32 am | Eric_B
Okay, so on this line in the sshd_config
“Scroll down and locate RhostsRSAAuthentication
Change Value to no”
mine reads as:
#RhostsRSAAuthentication no
by default — do I need to remove the hash? or not touch that line at all?
I didn’t touch that line at all.
Second, like the previous comment, I get to the end of editing sshd_config in vi (within the terminal) and you say to save the file and exit vi editor. How do I do that? — ctrl-S saves a txt file to my user folder — I’m pretty sure that’s not right. I don’t know how to save a file in vi…
Anyway, upon testing I do not get prompted with the warning banner. Instead I get this (without the privacy edits):
XXXXs-MacBook-Pro:~ XXXXs$ ssh [email protected]
The authenticity of host ’192.168.1.100 (192.168.1.100)’ can’t be established.
RSA key fingerprint is __:__:__:__:__:__:__:__:__:__:__:__:__:__:__:__.
Are you sure you want to continue connecting (yes/no)? yes
Warning: Permanently added ’192.168.1.100′ (RSA) to the list of known hosts.
Password:
Last login: Sun Jul 26 10:41:34 2009
XXXX-XXXXXXX-Mac-Pro:~ XXXX$
Thanks for the tutorial and for any additional help!
July 26, 2009 at 9:30 am | Eric_B
to save vi:
press esc, then type ZZ (I was trying to type ctrl-ZZ, or cmd-ZZ)
Working!
Still curious about the “#RhostsRSAAuthentication no” line however,
I’m not sure what it is that need activation/deactivation or how much of a security risk it is if I delete the hash…
February 5, 2010 at 9:19 am | Mfrizzi
These are the things that make me long for a Mac! Even though this does seem a bit tricky, I just feel confident that it will work, as opposed to the Windows offerign which I am just unable to make work. I had to buy 3rd party remote access software because MS has a broken product. Can I get some of my purchase price refunded?